Hey everyone! Awesomeness coming your way. Check out my new nail model Rita Mann's fabulous nails. She has been so kind to do some examples and has even included the names of the nail polish she used. I hope you enjoy these and I think the designs will be up in the silhouette store soon. Just wanted to make sure you all had a chance to see the instructions :) Have a wonderful Halloween!!!!!!
PS: Remember that you may want to try using blue masking tape instead of vinyl if you are having trouble with residue or if the vinyl is peeling off your nail polish :)


PS: Remember that you may want to try using blue masking tape instead of vinyl if you are having trouble with residue or if the vinyl is peeling off your nail polish :)
Halloween Nail Art Tutorial
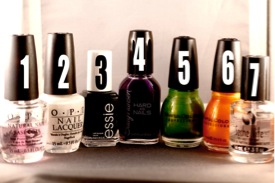
What I
Used:
1.
OPI
Natural Nail Base Coat
2.
OPI
Alpine Snow
3.
Essie Stylenomics
4.
Sally
Hansen Rock Bottom
5.
Sinful
Colors Happy Ending
6.
Sinful
Colors Cloud 9
7.
Seche
Vite Dry Fast Top Coat
Step 1: Always
start with a base coat on clean nails.
It protects your natural nails
from staining and helps your manicure to last longer.
Step 2:
Paint the Base Color
In most cases, this will be the
lighter of the two colors in your design.
I applied two coats for solid, even coverage.

Step 3: Apply
a top coat
This may sound strange, but I
have found that this step reduces the amount of
reside left behind by the vinyl. If you
choose not to do this and have some adhesive residue from the vinyl, rubbing
alcohol can help to remove it.
Step 4: Allow
all layers to dry completely.
This step is crucial in achieving
a crisp, clean design. I use Seche Vite
Dry Fast Top Coat for two reasons.
First, as the name suggests, it speeds up the drying time
immensely. Second, it actually goes
through all the layers of polish, bonding them together and creating a smooth,
firm base color for your nail design.
Tip: If I am not in a hurry to
complete my manicure, I will stop here and allow my nails to cure
overnight.
Step 5: Apply
nail templates
Cut designs from vinyl (or blue masking tape). Apply to your nail. Smooth it down to get rid of any bubbles of
creases, applying pressure around the inside edges to eliminate any gaps.

Step 6: Apply
Second Color
Paint an even layer of your
second color over all cut-out areas of the template. If necessary, apply a second coat to achieve
desired opaqueness.
Step 7:
Remove Vinyl Template
Peel off vinyl template slowly
and carefully.
Tip: I remove the vinyl design
while the second color of polish is still wet, but you can also allow it to dry
first.


Step 8: Seal
Your Design
Apply a top coat to protect and
prolong your manicure.
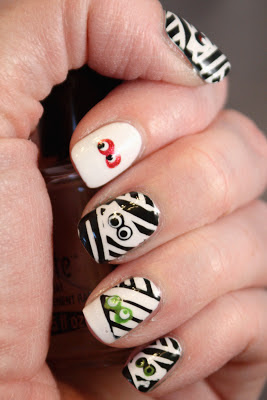
Also check out these great Mummy Nails. Just use a toothpick or something pointy to add the little pupils to the eyes. Lets all give Rita some praise for the awesome job she did!!!!!


What I Used:
Base: Gelous Advanced Nail Gel Coat
White: Sally Hansen White On
Green: Sinful Colors Happy Ending
Red: OPI The Show Must Go On!
Black: Essie Stylenomics
Top: Seche Vite Dry Fast Top Coat